The Ultramsg chatbot is a visual Workflow builder used to automate processes for send & receive message , and this article will be a tutorial for the WhatsApp Chatbot and an always up-to-date reference for anything new.
Create your first WhatsApp Chatbot
| 1- Log in to your Ultramsg account and click on the “Chatbot” button. |  |
| 2- click on the “templates” button To see ready-made WhatsApp Chatbot templates. |  |
A Chatbot can be saved by clicking the Save button in the Top Bar of the Workflow Builder , and if you want run and test chatbot you can click “Publish” button , and if you want stop chatbot you can click on “Stop” button.
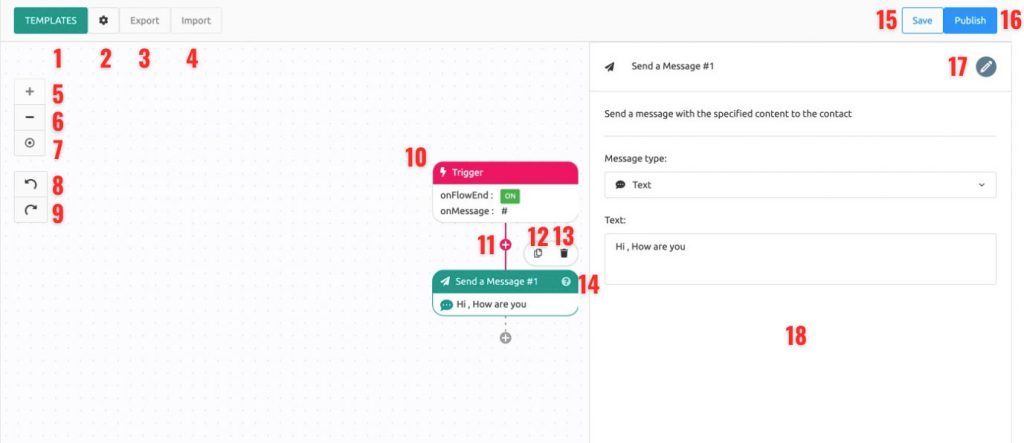
Quick definition for Chatbot Builder interface

- Explore ready-made WhatsApp chatbot templates.
- Chat bot settings.
- Export the chatbot to create a backup copy or to use it in another instance.
- Import and restore the WhatsApp Chatbot file.
- Zoom In.
- Zoom Out.
- Center.
- Undo.
- Redo.
- This is trigger fires when a message is received from the client.
- Add a new step to the chatbot.
- Copy the step, for easy duplicating and pasting.
- Delete step.
- You can hold the mouse down and move to move the step to another location within the chatbot.
- Save changes.
- Turn on and off WhatsApp Chatbot.
- Rename the step for easy management of the steps.
- step properties.
Chatbot steps

- Send a Message : Send a message with the specified content to the contact .
- Ask a Question : Send a specific question to the contact and the chatbot stops and waits for a response from the user , And you can also check the entered values and save the response from the user in Variable for later use.
- Branch :Allows Chatbot branches to be created based on contact fields, user variables, and system variables , etc.
- Jump : Allows a contact to jump to a specific step in this Chatbot. Once the maximum number of jumps is reached, the contact will proceed to the next step.
- HTTP Request : Allows HTTP Requests to be sent & responses to be saved as variables.
- Wait for response :Allows Chatbot to pause here and wait for user response to continue.
Dynamic System Variables Overview
Dynamic System variables can be used in chatbot you can read it easily.
| {{$contact.name}} | The name of the Client registered on WhatsApp |
| {{$contact.number}} | The number of the Client who is talking to the WhatsApp Chatbot like : 971507032874 |
| {{$contact.number.country_iso_code}} | Client country iso code like : UAE |
| {{$contact.number.country_code}} | Client country code like : 971 |
| {{$contact.number.international}} | The international number of the Client who is talking to the chatbot like : +971507032874 |
| {{$contact.number.national}} | The national number of the Client who is talking to the chatbot like : 0507032874 |
| {{$system.current_timestamp}} | The current timestamp can be converted to a time and date format after it is sent to your system via an http request. |
| {{$conversation.first_incoming_message}} | The first message sent by the client. |
| {{$conversation.first_incoming_message_timestamp}} | current timestamp for the first message. |
| {{$conversation.last_incoming_message}} | The last message sent by the client . |
| {{$conversation.last_incoming_message_timestamp}} | current timestamp for the last message. |
How to use System Variables
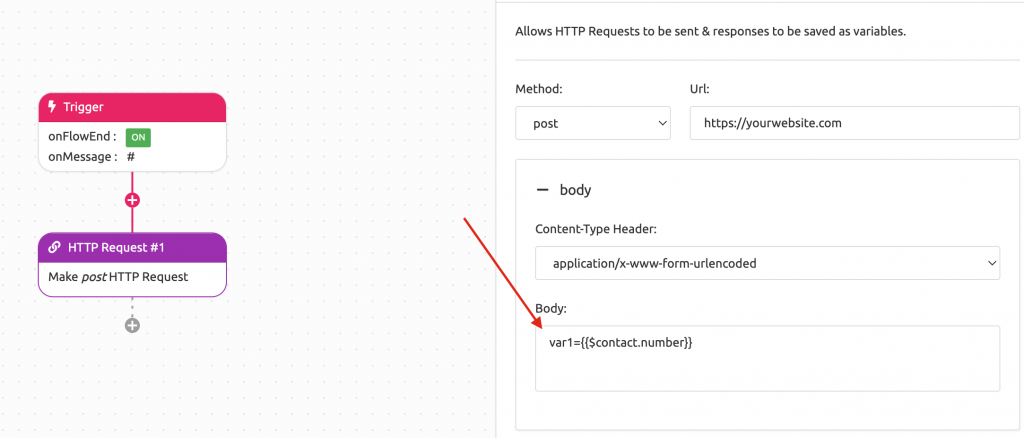
You can use system variables from anywhere in the chatbot (messages – http request url – http request parameters ),Just put the variable name as in the following pictures :


HTTP Request step
This Step allows HTTP Requests to be sent and their responses saved as Variables, with this step, you can query your database or use any third party API.
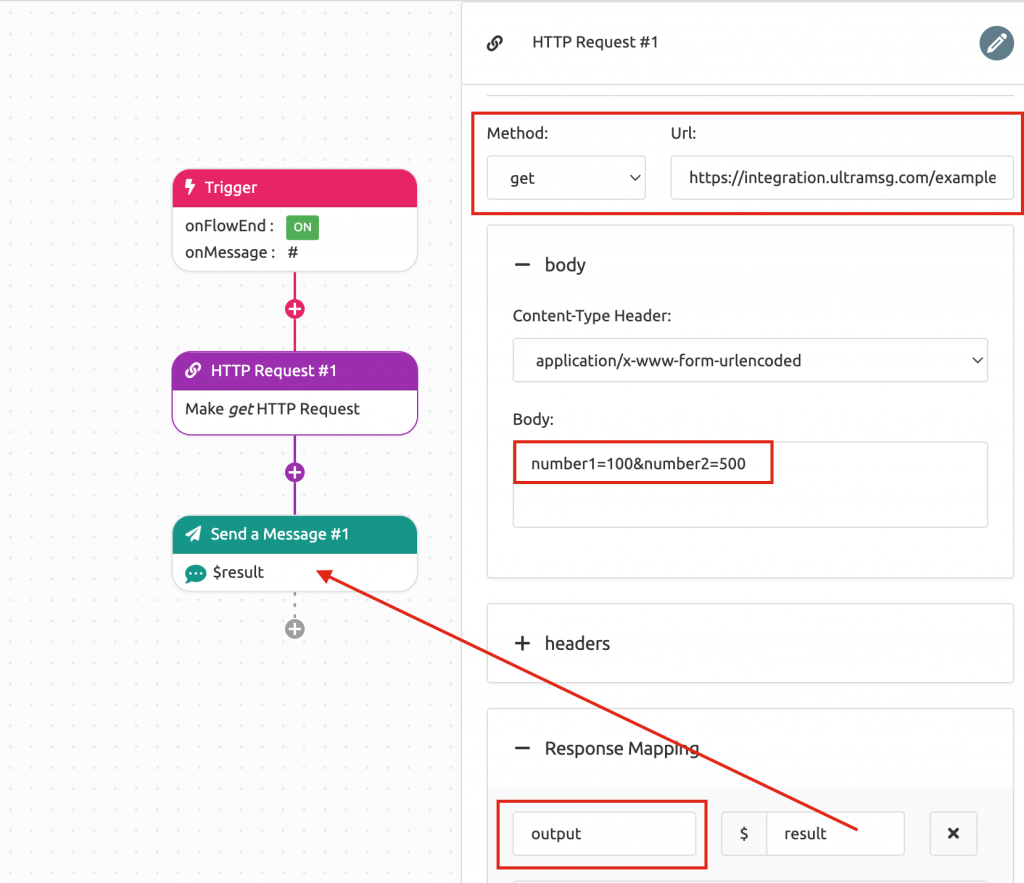
Now , we will make simple example of using an http request and saving the response in a variable .
Example URL : https://integration.ultramsg.com/examples/multiply-numbers.php
The variables that the page accepts : number1 , number2
http request type : GET
When creating the http request with sending parameters number1 and number2
https://integration.ultramsg.com/examples/multiply-numbers.php?number1=100&number2=500
The response should be in json like this :
{"output": 5000
}
key is output You can set any key name on your page or application and value is 5000 It is the value that will be stored in variable for later use in the WhatsApp Chatbot.

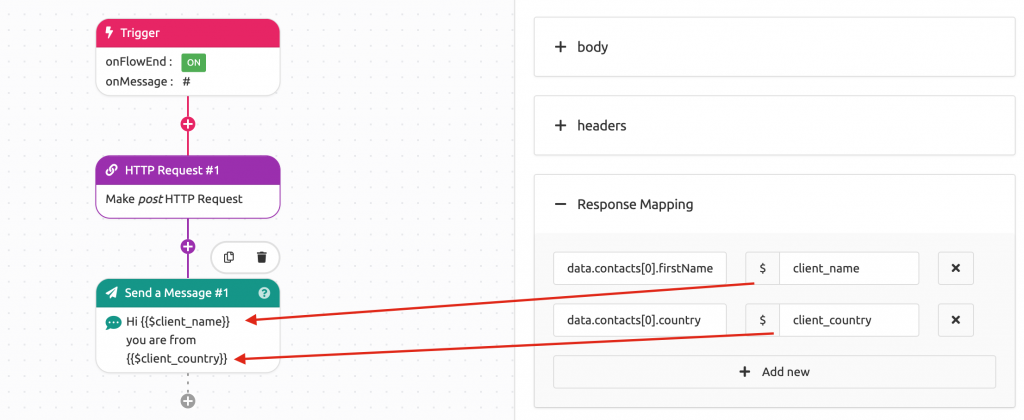
If the http JSON array request response is like this :
{
   "data":{
      "id":"6632223466234",
      "contacts":[
         {
            "firstName":"steve",
            "lastName":"smith",
            "country":"brazil"
         },
         {
            "firstName":"Jane",
            "lastName":"Doe",
            "country":"India"
         }
      ]
   }
}
You can access the client’s first name by using this key: data.contacts[0].firstName .
and to read the country of the second client using this key: data.contacts[1].country .

Pausing the chatbot when talking to the Client

if you set here 5 min so , Chatbot Will automatically pause for 5 min from last human message date , It is a great option to not disturb the customer in chatbot messages, and then if you do not respond to the customer for a period exceeding N minutes, the chatbot will work again, you can specify any value in minutes.